はじめに
2015年7月にリリースされた Kubernetes(K8s)![]() は,今日ではコンテナ・オーケストレーション・ツールとして幅広く利用されており,パブリック・クラウド・プラットフォーム上ではマネージドサービスも提供されております。
は,今日ではコンテナ・オーケストレーション・ツールとして幅広く利用されており,パブリック・クラウド・プラットフォーム上ではマネージドサービスも提供されております。
シスコのオブザーバビリティ・ソリューション,AppDynamics![]() は K8s に対応しており,アプリケーション・コンテナの自動インスツルメントを行うことが可能になっています。
は K8s に対応しており,アプリケーション・コンテナの自動インスツルメントを行うことが可能になっています。
本投稿では,GKE(Google Kubernetes Engine) 上で稼働する Java アプリケーションの自動インスツルメントを行い,AppDynamics でアプリケーション性能監視を行ってみます。
AppDynamics 実行環境
アプリケーション・コンテナの自動インスツルメントが行える AppDynamics 実行環境は以下のとおりです。
- AppDynamics コントローラ 20.3.0 +
- Cluster Agent 20.5+ : Cluster Agent の要件 / サポートされる実行環境

- Cluster Agent と AppDynamics Operator が K8s クラスタに対してインストールされている
サポートされる K8s 実行環境
Cluster Agent は以下の K8s 実行環境に対して互換性があります。
| Cloud Platform | Version |
|---|---|
| Kubernetes | 1.11, 1.13, 1.14, 1.17, 1.19.3 ( metrics-server |
| Amazon EKS | 1.11, 1.13, 1.14, 1.15, 1.16, 1.17, 1.18, 1.19 ( metrics-server |
| Azure AKS | 1.11, 1.13, 1.14, 1.18, 1.19, 1.20 ( metrics-server |
| Google GKE | 1.14, 1.15, 1.16, 1.17, 1.18, 1.19, 1.20 |
| Rancher Kubernetes Engine |
|
| Red Hat OpenShift | 3.11, 4.1, 4.2, 4.3, 4.4, 4.5, 4.6, 4.7 (metrics-server をデプロイする必要あり) |
| kubectl |
1.11.3+ |
自動インスツルメント対象のプログラミング言語
以下のプログラミング言語で書かれたアプリケーション・コンテナの自動インスツルメントが可能です(2021年5月現在)。
- Java
- Node.js 8.6+
- .NET Core on Linux
テスト環境
今回以下の環境でテストを実行しました。Operator / Cluster Agent のインストール前に,アプリケーションは稼働済のものとします。
- アプリケーション: Java / Spring Boot
- K8s: Google Kubernetes Engine(GKE)
Cluster Agent のインストール
AppDynamics ダウンロードサイト![]() より,Cluster Agent をダウンロードします。今回は appdynamics-cluster-agent-alpine-linux-21.3.1.2042.zip をダウンロードしました。次に,適当なディレクトリに zip アーカイブを展開します。
より,Cluster Agent をダウンロードします。今回は appdynamics-cluster-agent-alpine-linux-21.3.1.2042.zip をダウンロードしました。次に,適当なディレクトリに zip アーカイブを展開します。
unzip appdynamics-cluster-agent-alpine-linux-21.3.1.2042.zip
次に以下の 3つの マニフェストをアプリケーション実行環境,コントローラへの接続情報にあわせて編集します。
- cluster-agent-operator.yaml
- cluster-agent.yaml
- infraviz.yaml
cluster-agent-operator.yaml
881 行付近の以下の image: で始まる行に,Docker Hub cluster-agent-operator レポジトリからイメージを pull する設定を定義します。
      serviceAccountName: appdynamics-operator
      containers:
        - name: appdynamics-operator
          image: docker.io/appdynamics/cluster-agent-operator:0.6.8
なお,OpenShift の場合は,cluster-agent-operator-openshift.yaml を利用します。
cluster-agent.yaml
以下のように, AppDynamics コントローラへの接続(今回は同一VPC内で稼働するオンプレミス版コントローラのためプライベート IP アドレスを指定),Cluster Agent の Docker イメージレポジトリ,インスツルメント対象名前空間,インスツルメントする Java Agent のレポジトリを設定します。
apiVersion: appdynamics.com/v1alpha1
kind: Clusteragent
metadata:
  name: k8s-cluster-agent
  namespace: appdynamics
spec:
  appName: k8s-auto-instrument
  controllerUrl: http://10.0.0.35:8090
  account: customer1
  # docker image info
  image: docker.io/appdynamics/cluster-agent:20.10.0
  serviceAccountName: appdynamics-cluster-agent
  nsToMonitor: [default,appdynamics,dev]
  defaultAppName: k8s-auto-instrument
  nsToInstrumentRegex: dev
  instrumentationMethod: Env
  resourcesToInstrument: [Deployment,StatefulSet]
  imageInfo:
    java:
      image: docker.io/appdynamics/java-agent:latest
      agentMountPath: /opt/appdynamics
今回は Java アプリケーション pod のみですが,Auto-Instrument Applications with the Cluster Agent![]() にある以下の例のように,Java / .Net Core 混在のアプリケーションの自動インスツルメントも可能です。
にある以下の例のように,Java / .Net Core 混在のアプリケーションの自動インスツルメントも可能です。
  #
  # auto-instrumentation config
  #
  instrumentationMethod: Env
  nsToInstrumentRegex: stage
  appNameStrategy: label
  instrumentationRules:
    - namespaceRegex: stage
      language: dotnetcore
      labelMatch:
        - framework: dotnetcore
      appNameLabel: appName
      imageInfo:
        image: "docker.io/appdynamics/dotnet-core-agent:20.11.0-linux"
        agentMountPath: /opt/appdynamics
    - namespaceRegex: stage
      language: java
      labelMatch:
        - framework: java
      appNameLabel: appName
      instrumentContainer: select
      containerMatchString: .*
      imageInfo:
        image: "docker.io/appdynamics/java-agent:21.3.0"
        agentMountPath: /opt/appdynamics
infraviz.yaml
以下のようにマニフェストを定義し,Machine Agent + Analytics Extension を pull できるようにします。
apiVersion: v1
kind: ServiceAccount
metadata:
  name: appdynamics-infraviz
  namespace: appdynamics
---
apiVersion: appdynamics.com/v1alpha1
kind: InfraViz
metadata:
  name: appd-infraviz
  namespace: appdynamics
spec:
  controllerUrl: http://10.0.0.35:8090
  image: docker.io/appdynamics/machine-agent-analytics:latest
  account:
  globalAccount:
各マニフェストを適用
GKE クラスタ(cluster-1)に以下のコマンドで接続します。
gcloud container clusters get-credentials cluster-1 --zone asia-northeast1-c --project <your-project>
kubectl コマンドを用いて appdynamics 名前空間の作成,AppDynamics コントローラの Access Key を secret として保存,各マニフェスト適用を行います。
kubectl create namespace appdynamics
kubectl create -f cluster-agent-operator.yaml
kubectl -n appdynamics create secret generic cluster-agent-secret --from-literal=controller-key=<your-access-key>
kubectl create -f cluster-agent.yaml
kubectl create -f infraviz.yaml
AppDynamics Application Flow Map の確認
Operator / Cluster Agent をインストール後,5分程度待ってから,AppDynamics コントローラ上で Application Flow Map を確認しますと,正常に監視が開始されていることが確認できました。
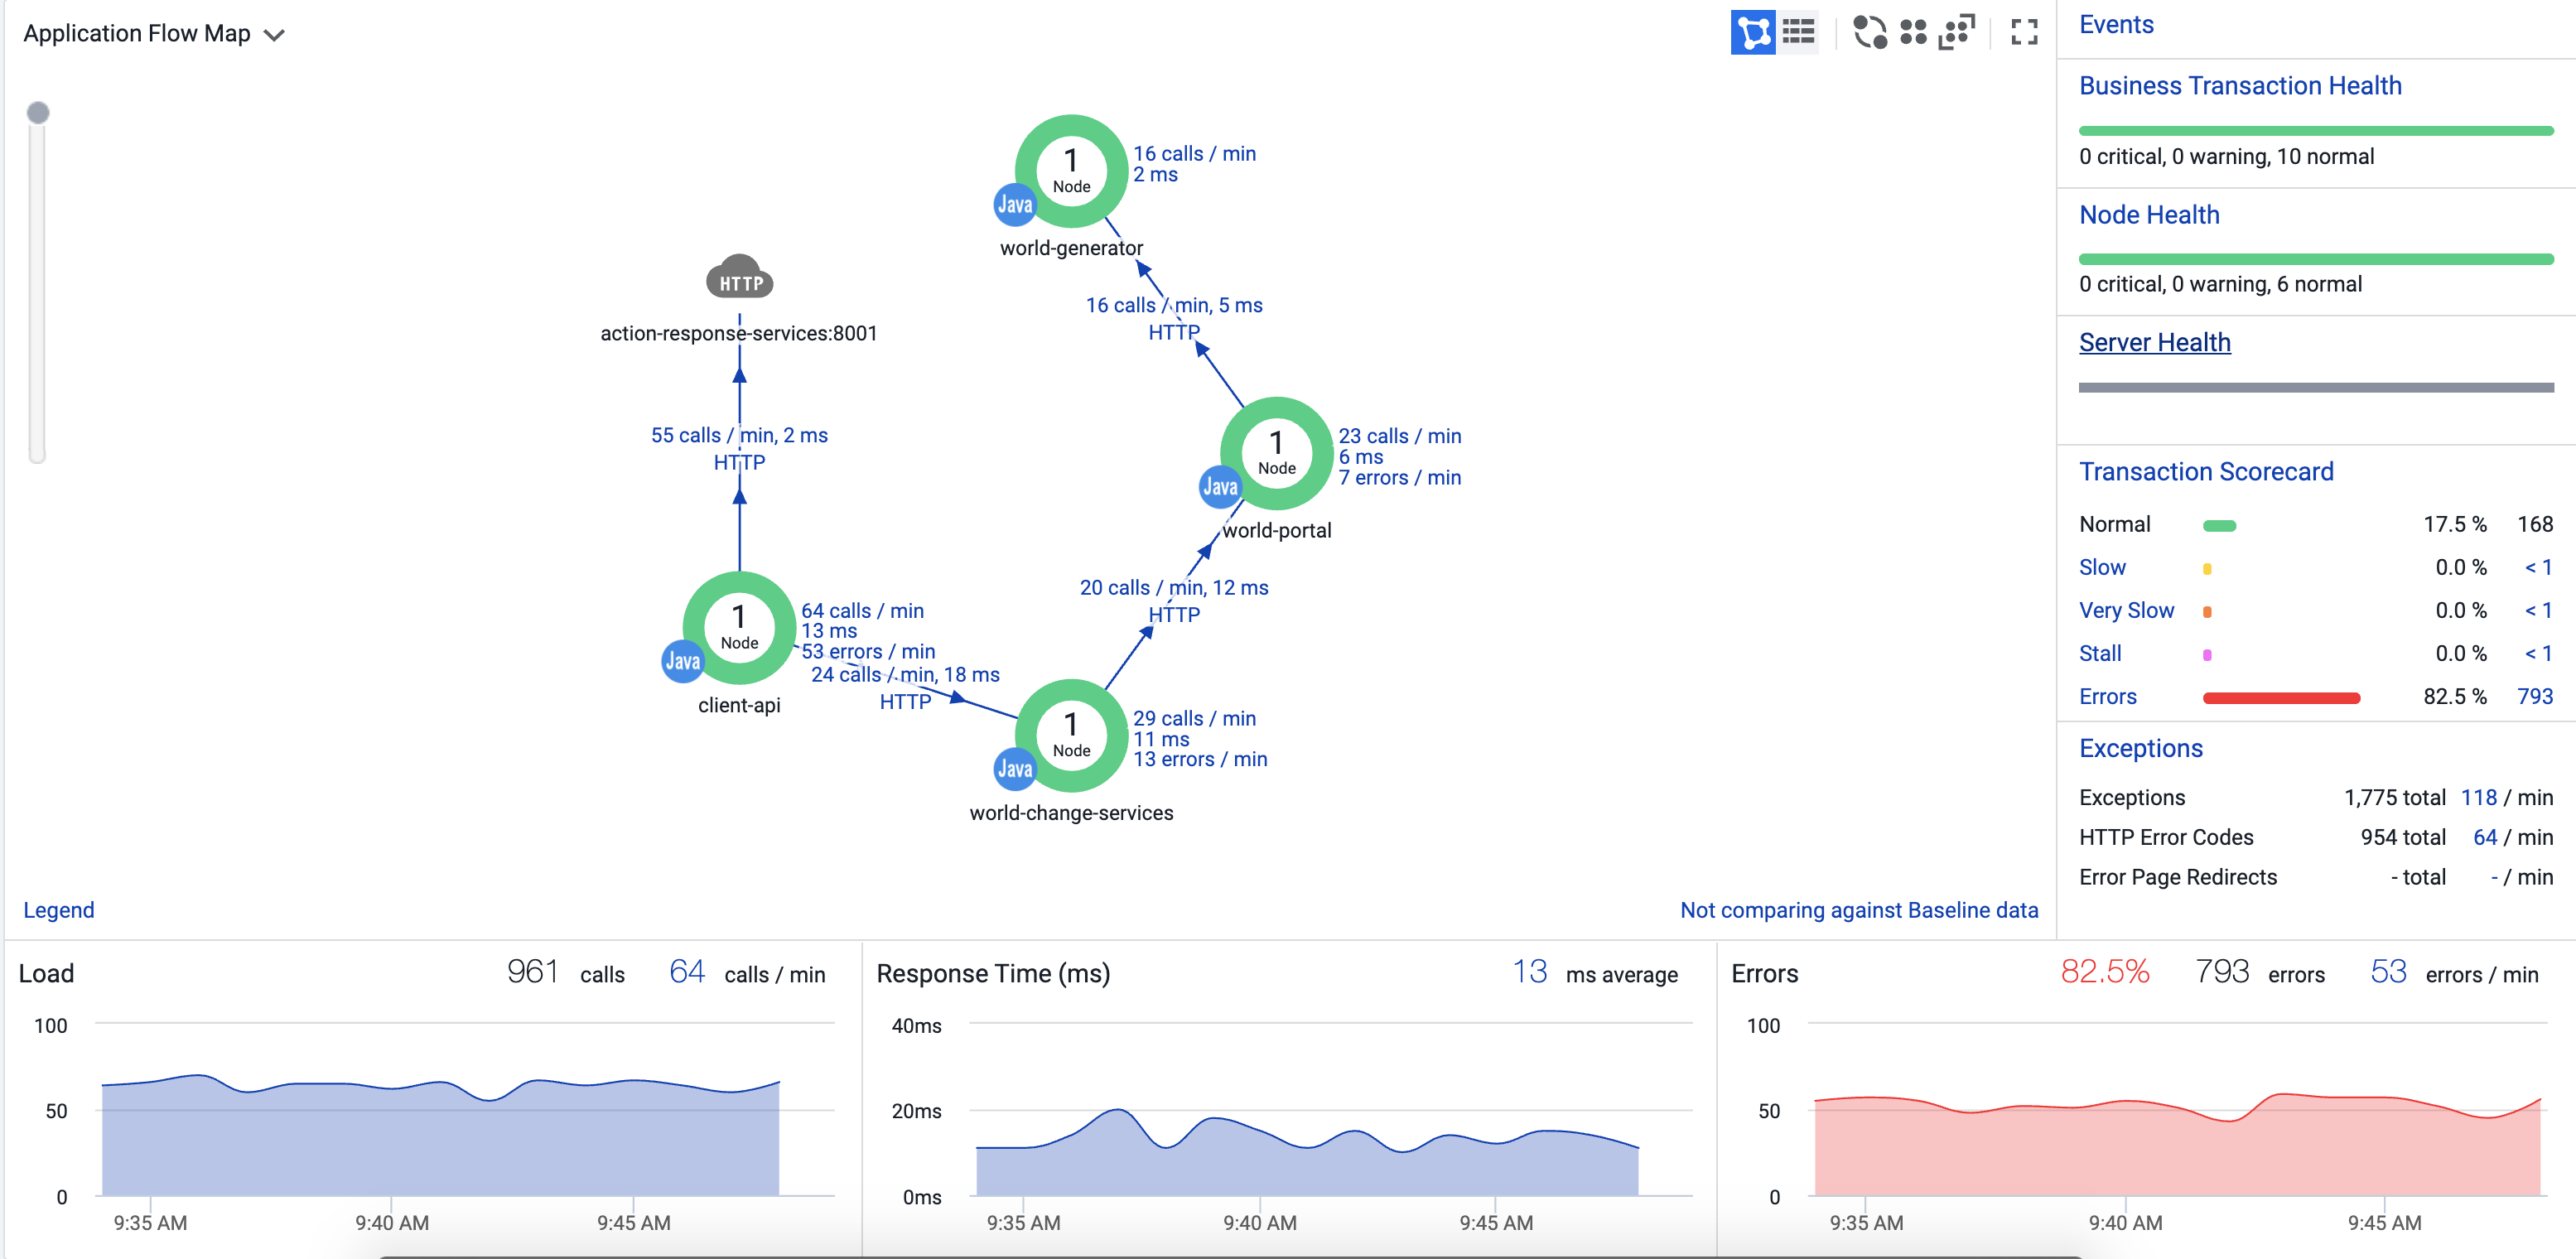
次に,GKE クラスタの Java アプリケーション pod の一つを選択,DETAILS タブを選択しますと,
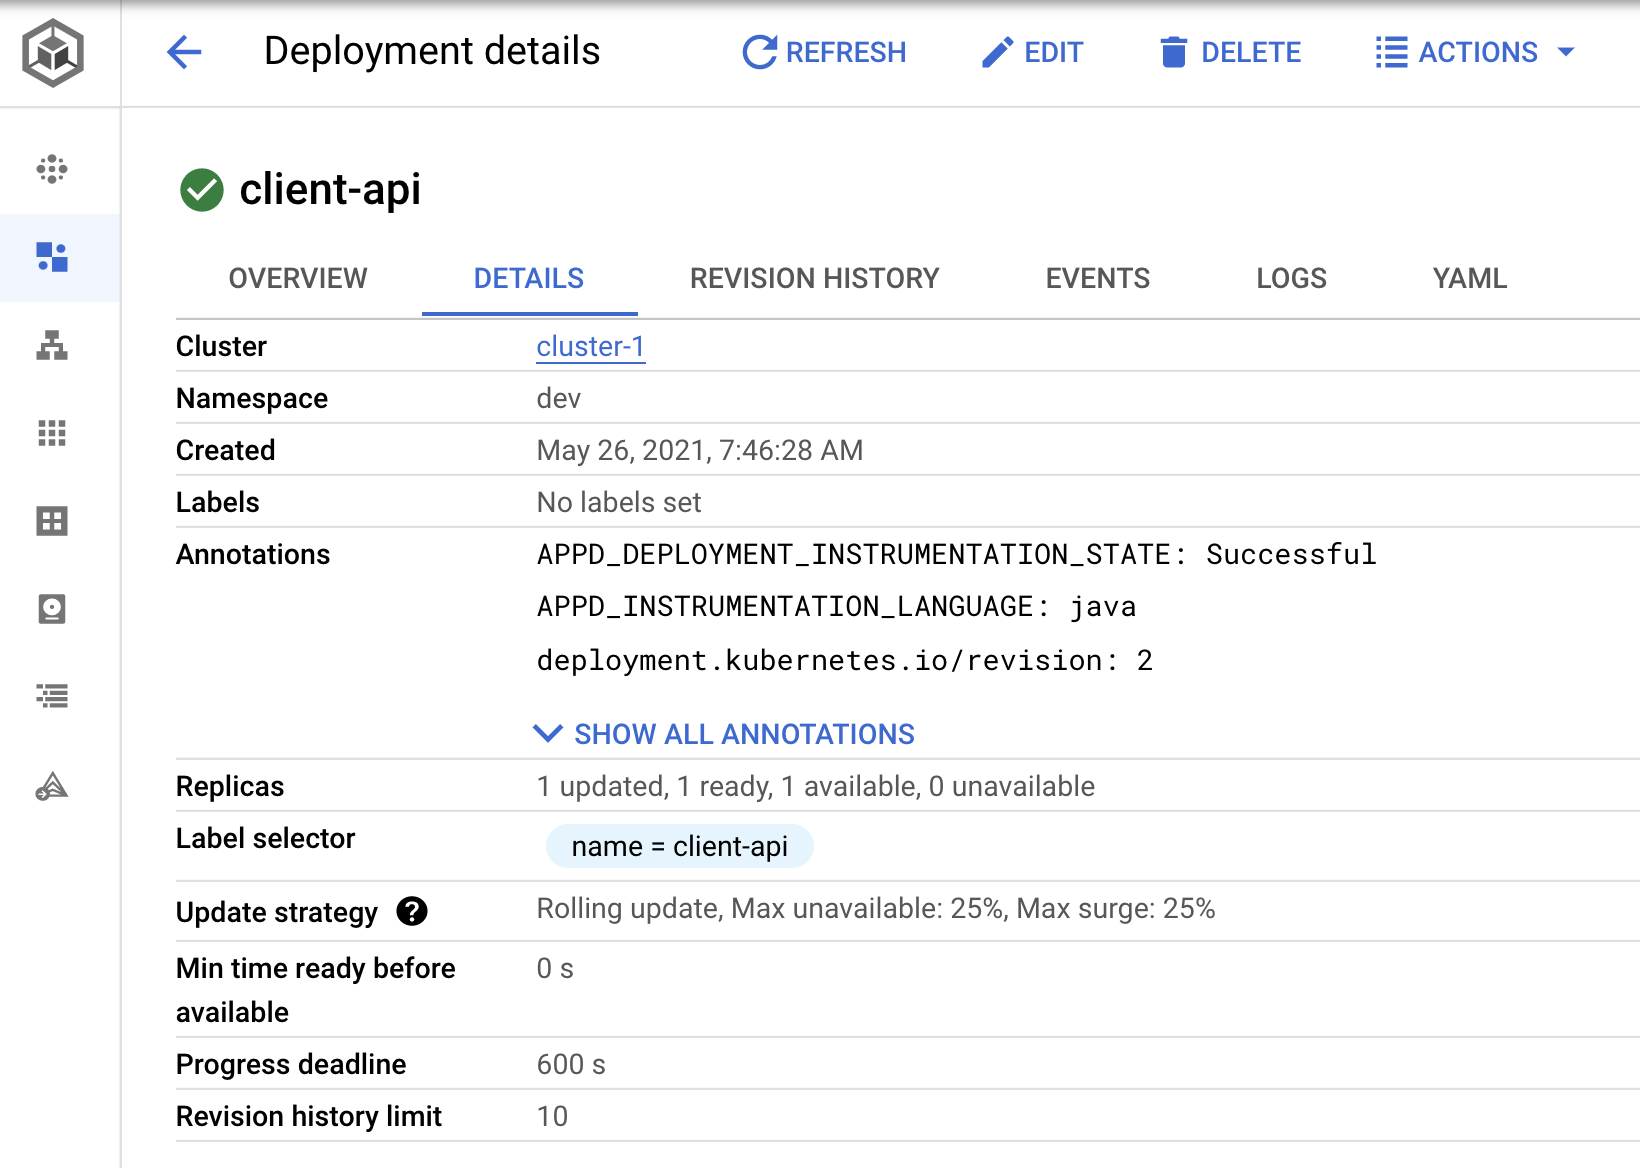
Annotations に以下の記載があり,正常に Java Agent のインスツルメントが行われていることがここでも確認できました。
APPD_DEPLOYMENT_INSTRUMENTATION_STATE: Successful
APPD_INSTRUMENTATION_LANGUAGE: java
まとめ
今回は K8s クラスタ上で稼働する Java アプリケーションに対する AppDynamics Java Agent の自動インスツルメントの概要について説明させていただきました。
従来は,APM Agent を同梱したアプリケーション・コンテナ・イメージ を事前に作成しておき,デプロイする必要がありましたが,対応する言語で開発されたアプリケーション・コンテナであれば,基本的にマニフェストの設定のみで自動インスツルメント可能なことがご理解頂けたかと存じます。
Authors